The Mesh Gradient Generator Landscape: A Designer's Guide for 2026
You know the feeling. You're building a SaaS hero section and the usual linear-to-radient combo looks flat. A Dribbble shot catches your eye — that fluid, aurora-like blend with soft grain dissolving across the canvas. You want it. You open Illustrator, drop a gradient mesh, wrestle with control points for ten minutes, and the result still looks like abstract digital camouflage instead of the dreamy blur in your head. So you search "mesh gradient generator," and suddenly you're staring at fourteen tabs — web apps, Figma plugins, iOS apps, GitHub repos — each promising the same thing but delivering it completely differently.
I've been through this on every project this year. Mesh gradients have graduated from trend to legitimate design category in 2026, but the tooling is still scattered. This guide maps the full landscape so you can find the right mesh gradient generator for your exact workflow — whether you're shipping a landing page, illustrating a print piece, or handing assets to a developer.
The Mesh Gradient Moment
Mesh gradients — sometimes called aurora gradients, dreamy blurs, or freeform gradients — are the defining visual flourish of 2026 design. They show up everywhere: tech keynote backdrops, indie startup landing pages, portfolio hero sections, even mobile app onboarding screens. The aesthetic sits somewhere between a watercolor wash and a chromatic OLED smear, and it works because it brings depth and atmosphere without fighting the content sitting on top of it.
What changed? Two things. First, tools got good enough that designers outside the Adobe ecosystem could actually make them. Second, the W3C is actively discussing a native CSS mesh-gradient function — issue #7648 on the CSSWG drafts repo — which means someday browsers will render these directly without SVG hacks or layered radial gradients. For now, though, the tool landscape is split across four categories, each with its own strengths.
The Tool Landscape: 4 Categories
Before diving into specific tools, it helps to understand how mesh gradient generators break down. Every option falls into one of four buckets:
Web generators live in the browser. No installation, no plugin dependencies, no platform lock-in. You open a URL, drag some color points, export an image or code snippet, and move on. They're ideal for quick output and one-off assets.
Design plugins extend the tools you already use — Figma, Framer, Penpot. They keep your assets inside your existing workflow with no context switching or re-importing.
Mobile apps let you create mesh gradients on the go. Most lean into AI — type a prompt like "neon sunset aurora" and get a gradient back.
Code libraries and CSS collections are for the developer handoff. They ship ready-to-use gradients in SwiftUI, Flutter, React, or plain CSS. Designers rarely touch these directly, but knowing they exist helps you specify the output format your dev team needs.
The right choice depends on where your output is headed. Let's walk through each category.
Web Generators: Best for Quick Output
When I just need a gradient fast — no signup, no project file, no fuss — I go straight to a browser tool. Three stand out in 2026.
ColorFlow is the most sophisticated free option I have found. Built by LS.GRAPHICS, it gives you a drag-and-drop mesh editor with bezier handles, multiple interpolation modes (OKLab and LCH are the ones that prevent muddy transitions), and a full suite of post-processing effects — film grain, progressive blur, chromatic aberration, glass distortion. The WebGL rendering runs at 60 fps with zero lag, and you can export PNG, SVG up to 4K, or save a .colorflow file to revisit later. What makes it special is the procedural animation: you can set control points to drift slowly, creating a breathing motion that is perfect for landing page backgrounds. All of this is free, no login required.
InstantGradient takes a different approach. Where ColorFlow is a precision instrument, InstantGradient is a discovery engine. Hit the spacebar and it generates a mesh gradient instantly with random colors, distortion, swirl, and grain. You can lock colors you like and shuffle the rest. The export options are generous: PNG, WebP, animated MP4 video, plus CSS, Tailwind, and SCSS code snippets. The Pro tier ($39/year) unlocks 2K+ quality exports, React/JS shader code, and a REST API. For designers who want to iterate fast and grab something that already looks good, this is the tool.
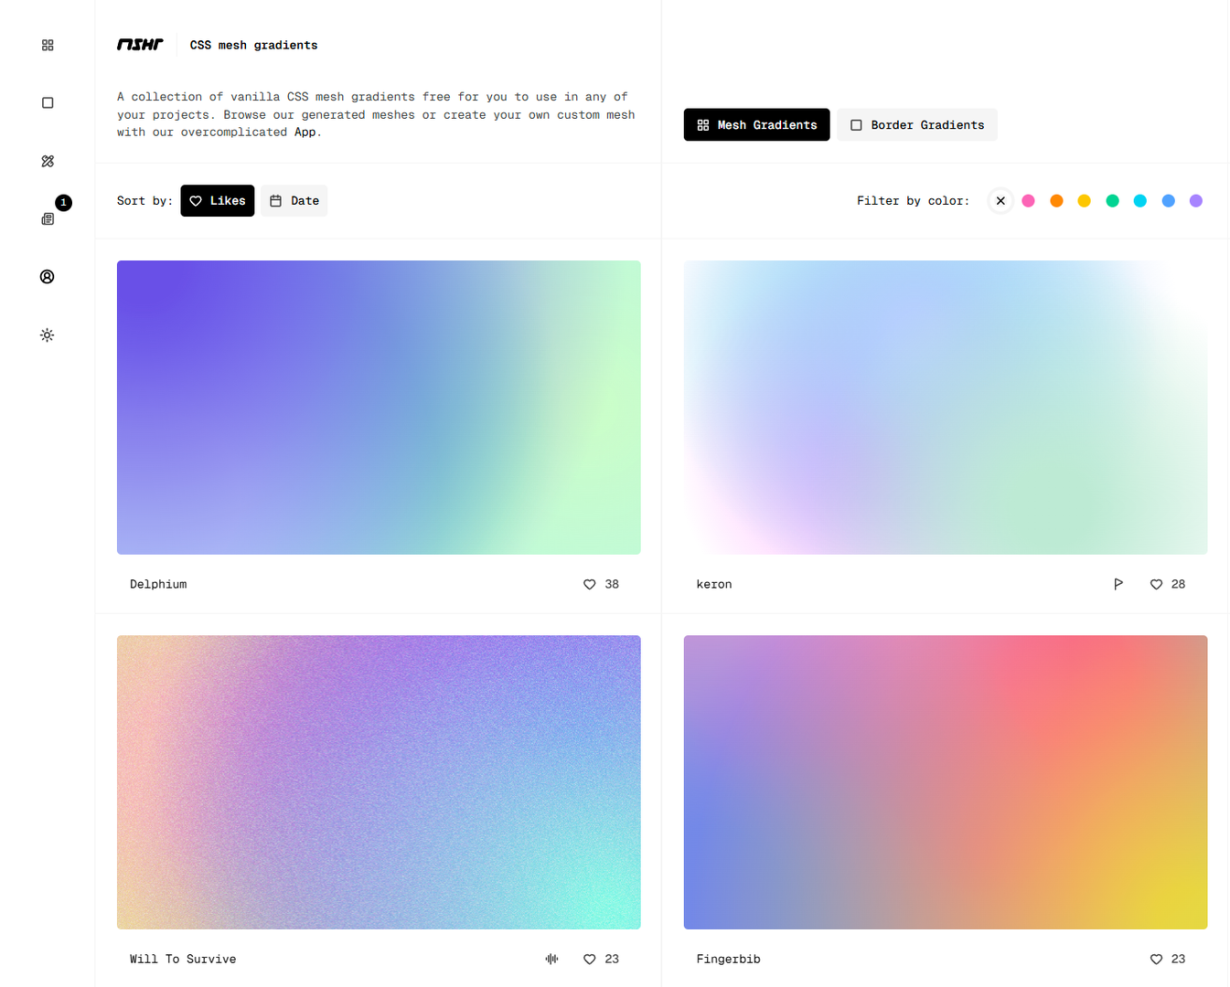
mshr.app, by Tipografo, is the CSS-first option — a library of 182 free mesh gradients you can browse by color and grid type, plus a custom creator tool. The output is straight CSS background declarations with layered radial gradients. It is ideal for developers who need drop-in gradient code, and the dark/light mode toggle helps preview how the gradient behaves in both contexts. No export fuss, no file management — just copy and paste.
Each of these fills a different niche, but they share one limitation: they produce raster or CSS output, not native vector mesh objects. If you need an editable gradient inside your design tool of choice, you need a plugin.
Design Plugins: Best for Existing Workflows
The fastest way to work is to never leave your design tool. Figma, the 800-pound gorilla of UI design, has several mesh gradient plugins worth knowing. Gradient Mesh and Generative Gradients both create freeform-style color distributions as Figma fills. They are not as precise as a web generator — you typically let the algorithm decide the color spread — but they keep your output as a live Figma object that scales with your layout.
For Framer users, the ColorFlow embed plugin brings the full colorflow.ls.graphics experience inside your Framer canvas, which is a game-changer for no-code landing pages built directly in Framer.
Penpot, the open-source Figma alternative, has Meshy — a community plugin that approximates mesh gradient fills. It is less mature than the Figma options, but Penpot's user base is growing fast, and Meshy fills a gap that Penpot's native toolset does not address.
The trade-off with plugins is fidelity and control. If you need precise control point placement, OKLab interpolation, or grain effects, you will still want to create in a dedicated web generator and import the result. But for 80% of UI work, a Figma plugin is fast enough.
The Grain Effect Workflow
If there is one question I see asked more than any other in 2026, it is this: how do I add that dissolving grain texture to my mesh gradient? Two Reddit threads from just days ago — one on r/graphic_design and one on r/Affinity — both hit 80+ points asking the same thing. The grain effect is what separates a flat gradient from a tactile, almost-printed surface, and the vector workflow for it is not obvious.
Here is how I approach it across three output types:
For web output: Use CSS SVG noise filters. Apply feTurbulence and feColorMatrix inside an SVG overlay, then composite it over your mesh gradient with mix-blend-mode: multiply or overlay. The result is fully scalable and the grain amount is adjustable with CSS variables. ColorFlow builds grain directly into its effect stack, which makes this trivial.
For print / vector illustration: Export your mesh gradient as a high-res PNG from your web generator, place it in Illustrator, and apply Effect > Texture > Grain. Set the grain type to "Sprinkles" and adjust intensity. This rasterizes the effect, so keep a copy of the clean gradient for later edits. If you are working in Affinity Designer — which, frustratingly, still has no mesh gradient tool — you will need to create the gradient externally and bring it in as a placed image.
For mobile UI: If you are shipping assets to a developer, export a PNG with grain baked in, or provide the mesh gradient and the SVG noise filter as two separate layers so the developer can composite them at runtime. SwiftUI's MeshGradient (iOS 18+) handles smooth color transitions natively but does not support grain — that has to be added with a Metal shader or image overlay.
No mesh gradient generator handles grain end-to-end yet, but InstantGradient and ColorFlow both include grain in their export pipeline, which saves you the post-processing step in most cases.
Choosing the Right Generator
There is no single best mesh gradient generator in 2026 — the right one depends entirely on where your output is going. Here is the decision framework I use:
For web UI / SaaS landing pages → ColorFlow for the gradient, then InstantGradient if you want animated MP4 export. Both handle grain natively. Hand the developer CSS or a high-res PNG.
For print / illustration → Fountn or ColorFlow for maximum resolution and color fidelity. Export SVG if your print tool supports it, otherwise high-res PNG. Use Illustrator Effects for grain.
For mobile app UI → ColorFlow for the gradient asset. If the team is using SwiftUI, point them at Apple's native MeshGradient and use ColorFlow as a reference design. For Flutter or React Native, export a PNG with grain baked in.
For developers building a product → InstantGradient Pro gives you a REST API and React shader exports. mshr.app gives you raw CSS. The W3C spec is still open and unassigned, so do not hold your breath for browser-native mesh gradients in production yet — but keep an eye on the GitHub issue for movement.
Mesh gradients are not going anywhere. The tools are maturing fast, and the gap between what you imagine and what you can create is shrinking every month. Pick the generator that fits your output, learn its grain workflow, and you will have a signature visual style that works across every medium.
Tags
Linh Nguyen
Graphic Designer
Passionate Graphic Designer | Specializing in Illustration Design | Bringing Captivating Visuals to Life